Learning how to customize a mockup is one of the most valuable skills any designer can develop. Mockup customization lets you present your work in a professional, real-world context without expensive photography or complex 3D software. Whether you are new to PSD mockup editing or want to sharpen your Photoshop mockup tutorial knowledge, this guide covers every stage of the mockup design workflow — from picking the right file to exporting a polished result. Browse our full mockup collection to find the right PSD before you begin.
Step 1: Choosing the Right Mockup
The first step to customize a mockup like a pro is choosing the right PSD file. A high-quality source file makes every part of the mockup customization process faster, cleaner, and more predictable. Before you open Photoshop, evaluate any file you are considering against this checklist:
- High resolution, ideally at least 4000×3000 pixels, so details stay sharp at any output size
- Well-organized layers with clear, descriptive names that make navigation easy
- Smart Objects so you can swap your design in with a single double-click
- Isolated elements that give you independent control over backgrounds, shadows, and overlays
Step 2: Opening the Mockup in Photoshop
Before you customize a mockup, take a moment to orient yourself inside the document. Rushing straight into editing without understanding the layer structure is the most common mistake beginners make in PSD mockup editing.
- Open Photoshop and load the PSD file via File > Open.
- Go to the Layers Panel and expand all layer groups to understand the full structure.
- Find the Smart Object layer, usually labeled “Your Design Here” or “Replace Me.” It will show a small Smart Object icon in its thumbnail.
Taking this orientation step seriously will make every subsequent action in your mockup design workflow faster and more confident.

Step 3: Replacing the Design
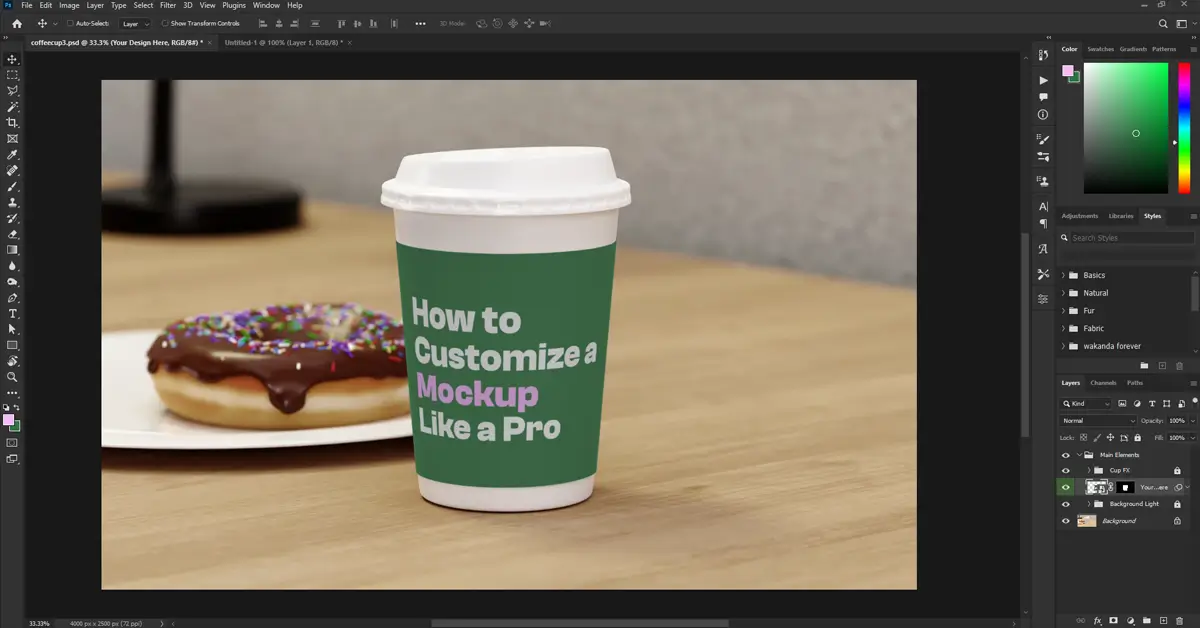
This is the core action every time you customize a mockup. Knowing how to replace a design in a mockup using Smart Objects is the single most important Photoshop skill in this entire workflow. Follow the sequence exactly:
- Double-click on the Smart Object thumbnail in the Layers Panel.
- A new window will open containing the placeholder artwork at the correct canvas size.
- Paste or drag in your own design file.
- Resize and reposition as needed to fill the canvas correctly.
- Save the Smart Object with
Ctrl + S(orCmd + Son Mac), then close the window. - Return to the main document and your design will appear automatically, perfectly aligned with all mockup effects applied.
💡 Good to know: If your artwork does not fill the Smart Object canvas cleanly, the distortion or crop will show in the main mockup. Always check that your design sits flush with the placeholder boundaries before saving.

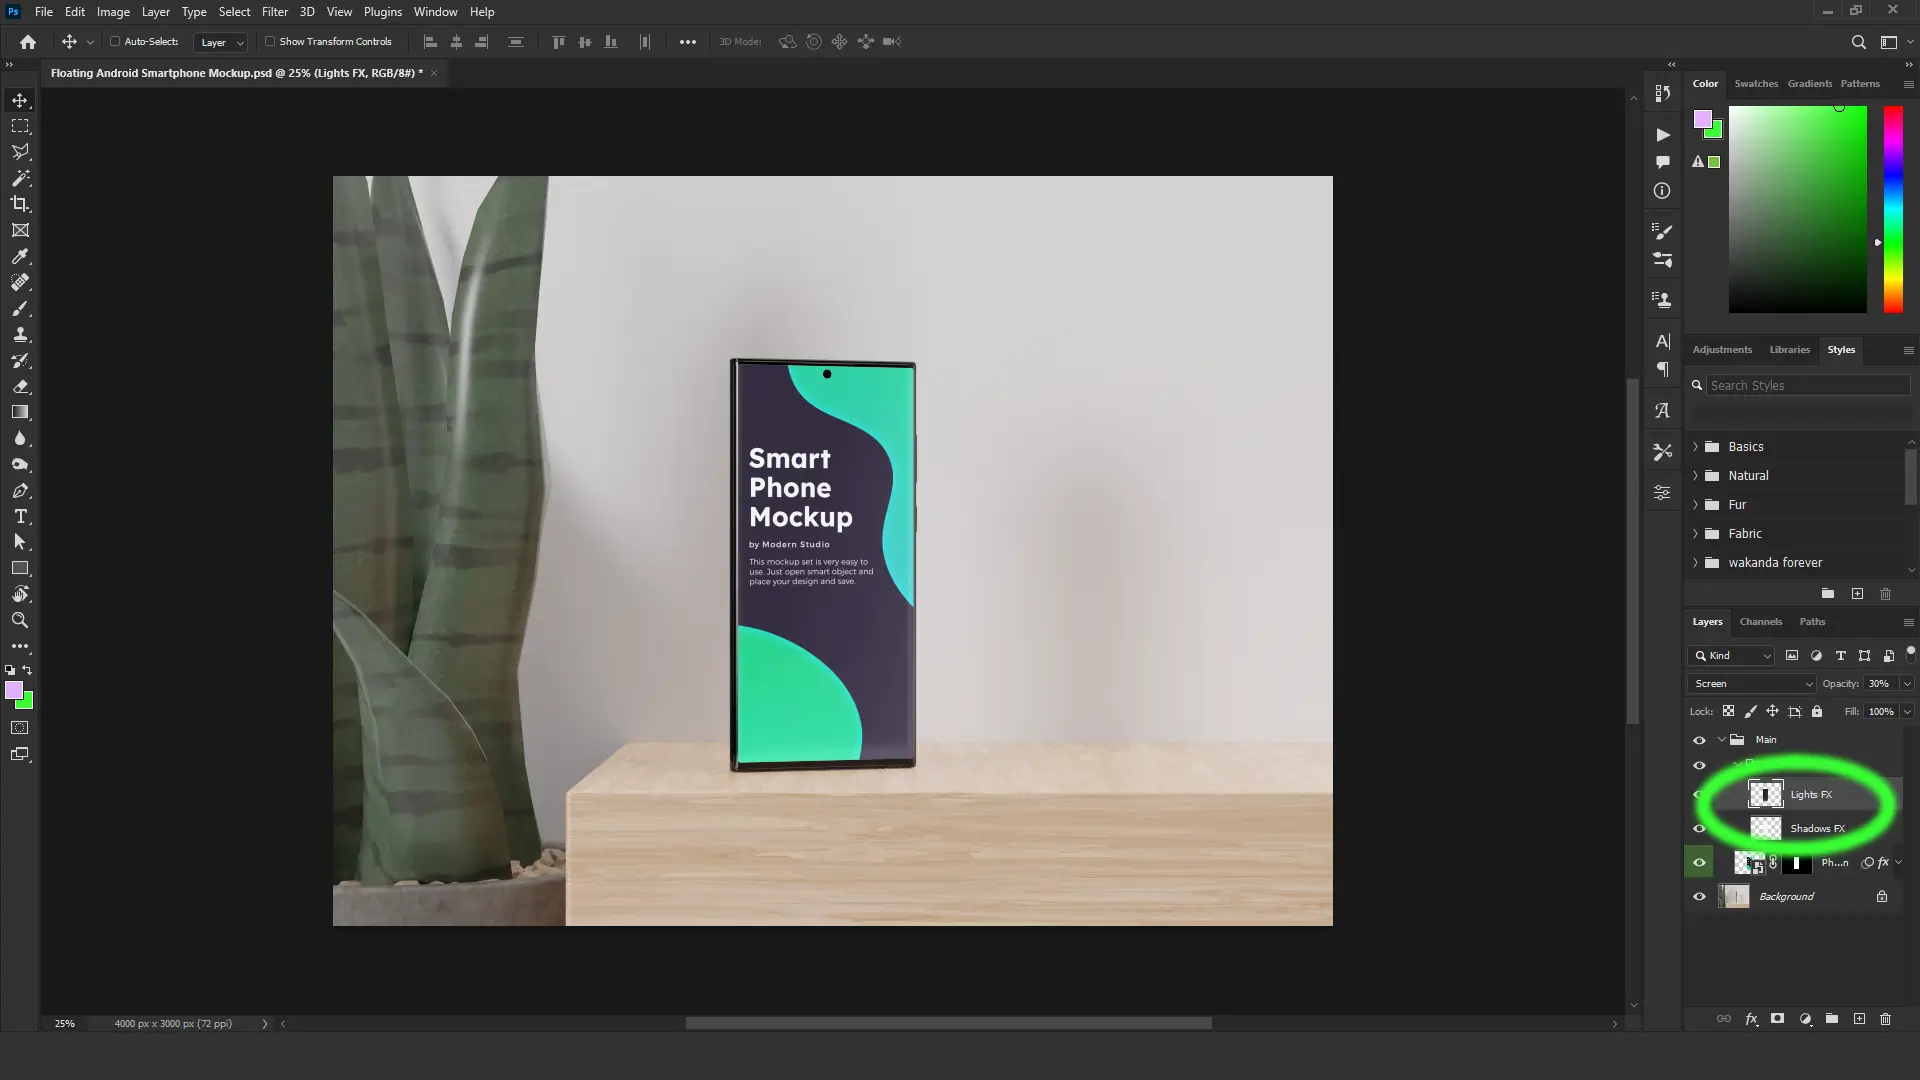
Step 4: Adjusting Shadows and Highlights
Realistic lighting is what separates a convincing mockup from a flat cutout. Adjusting shadows and highlights is a key part of how to customize a mockup that looks professionally finished. Most quality PSD files include dedicated shadow and highlight layers you can tune independently.
- Locate the Shadow and Highlight layers in the Layers Panel.
- Reduce or increase the Opacity slider to control how strong each effect appears.
- For manual refinements, select the Brush Tool (
B) with a soft, low-opacity brush and paint in black or white to sculpt the effect by hand. - Adjust the Blend Mode if needed. Multiply is standard for shadows; Screen works well for highlights.
Step 5: Changing Backgrounds and Colors
Knowing how to change the background in a PSD mockup is essential for matching your brand palette or creating a specific mood for the presentation. Most mockups include a dedicated background layer that is fully customizable.
- Find the Background layer at the bottom of the layer stack.
- Use the Fill Tool (
G) for a solid color, or add a Gradient Fill Layer for something more atmospheric. - If the background is a Smart Object, double-click it and replace the contents just as you would with your design.
- Use Hue/Saturation (
Ctrl + UorCmd + U), Color Balance, or Levels to fine-tune the tone and match your brand.

Step 6: Advanced Mockup Customization
Once you are comfortable with the basics of mockup customization, these advanced techniques will push the quality of your work further and make your presentations stand out from every other designer using the same template.
Working with Textures
- Use Displacement Maps to make your design follow the natural curves and creases of a surface
- Apply Layer Masks to add subtle wear and texture for a more realistic, lived-in look
Adding Depth with Blur
- Open the Blur Gallery via Filter > Blur Gallery > Tilt-Shift to simulate camera depth of field
- Apply a Gaussian Blur to background elements to draw the eye toward the product
Enhancing Lighting
- Add Gradient Map adjustment layers to create moody, directional lighting across the scene
- Use Soft Light or Overlay blend modes to strengthen the effect of highlights
- Build custom shadows with the Multiply blend mode combined with a soft brush on a blank layer
💡 Extend your toolkit: Dedicated Photoshop plugins for mockup designers can dramatically speed up shadow automation, Smart Object management, and lighting. These tools are worth exploring once you have the fundamentals of how to customize a mockup locked in.
🔌 Read our guide: 8 Best Photoshop Plugins and Tools for Mockup Designers. Recommended tools for every workflow level.
Step 7: Exporting the Final Mockup
The final stage of mockup customization is choosing the right export format. Before you export, zoom in to check that your design sits cleanly within the mockup and that no shadows, highlights, or color adjustments look off.
Best for transparent backgrounds or when you need the highest quality for print or presentations
Ideal for web use where file size matters and a transparent background is not required
Save this alongside your export to keep all layers intact for future revisions
Go to File > Export > Save for Web (Legacy) to access full compression controls and preview the file size before committing to a final export.

Conclusion
Customizing a mockup is a skill that improves with practice. Whether you’re replacing designs, adjusting shadows, or adding advanced effects, following these steps will help you achieve professional results. For high-quality, easy-to-edit mockups, check out our collection at ModernPSD.com!
Start Customizing Mockups Today
The more you practice how to customize a mockup, the faster and more intuitive every step becomes. Focus on quality over speed at first and the efficiency will follow naturally.
Browse All Mockup Templates →Frequently Asked Questions
What software do I need to customize a PSD mockup?
You need Adobe Photoshop to edit PSD mockups, as it supports smart objects, layers, and blending modes for seamless customization.
How do I replace the default design in a mockup?
Double-click the Smart Object layer in the Layers Panel, paste your design into the window that opens, save the file, and close the window. The main document updates automatically to reflect your artwork with all mockup effects applied.
How do I change the background in a PSD mockup?
Locate the Background layer at the bottom of the layer stack and use the Fill Tool for a solid color, a Gradient Fill Layer for a gradient, or adjustment layers like Hue/Saturation and Color Balance to shift the existing tone to match your brand.
Do I need After Effects to use an animated mockup?
Not always. Animated mockup templates like the Animated iPhone Swipe Mockup from ModernPSD run entirely inside Photoshop and export directly as GIF files with no After Effects required.
What file format should I export my finished mockup in?
Use PNG for the highest quality or when you need a transparent background. Use JPG for web use where smaller file size matters. Save the PSD alongside your export if you want to keep all layers accessible for future edits.